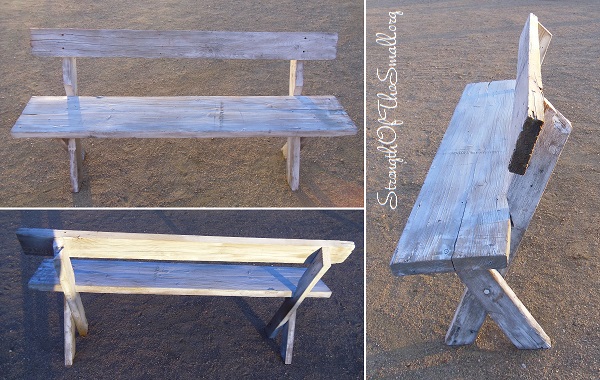
I enjoyed spending the whole day with my family outdoors today as I watched my kids running around the backyard, giggling while hunting for Grasshoppers as I was building a second Reclaimed Primitive Wood Bench. These are the days we cherished the most since the cold weather is setting in slowly but surely and we might not have an opportunity to spend time outdoors until next year.
Materials/Tools Needed:
Scrap/Reclaimed Wood
Screws
Drill, Drill-bits
Spray Paint/Paint/Stain
Wood Chop Saw
Wood File
Step by step:
Decide how big or small you want your bench to be
Decide on the design of the legs (for my bench I decided on a 30 degree angle for the cut on the legs since the bench is not deep)
Measure and cut your wood
Screw your pieces together
Using a wood file, file the rough/sharp edges of the wood to prevent splinters
Wash the bench to ensure that the paint will stick to the wood
Let dry and paint or stain
Reclaimed Primitive Wood Bench.
I hope you find this tutorial helpful and get creative building yours.
The weather is great today, making it is a good day to get busy in the garden.
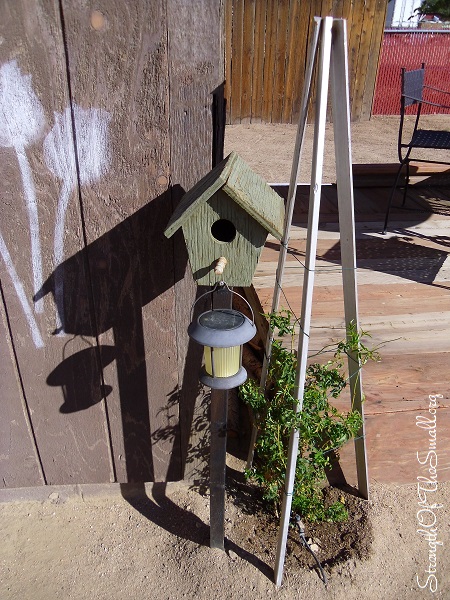
I got to bury the legs of the Garden Trellis that my husband build a few years back. This trellis will support the young vine (Common Jasmine), as well as provide proper training and maintenance.
This simple/primitive garden trellis was built using old pieces of some baseboard we removed from the house when we were doing the upgrades, a medium size screw to hold the top together as well as some twines.
Garden Trellis for Common Jasmine.
Materials/Tools Needed:
Old baseboard pieces
Jute Twine
Wood Screws, Power Drill, Drill Bits
Stain (for the Wood) or Paint/Spray Paint
Step by step:
Get your baseboard and cut them into three pieces of your desire height
Hold the three pieces and screw them together at the top
Paint/Stain the finish product (you could paint/stain the pieces of wood before or after screwing them)
Let dry
Wrap the twine around the tripod, keeping it nice and tight and it’s ready to be used.
Tending to the garden and backyard today was productive and fun. We achieved so much and will be moving forward with our design. I dug out one of my young Yucca Pendula from the backyard and moved it to the front yard. I dug out most of my Gladiola from the front garden and move them to the back, relocated my Star Jasmine and I was pleasantly surprise to find out that one of my mini Rose bush is blooming for the first time in at least 4 years! It has been growing in the front yard all this time until last month, when I moved it to the backyard. It has surprised me with beautiful white rose flowers. I guess it just needed a breath of fresh air.
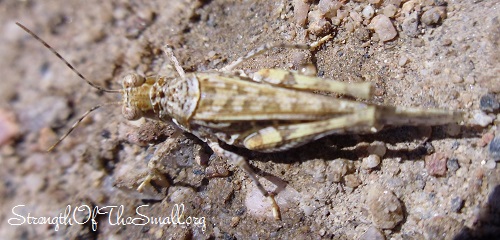
I spotted a few interesting insects, one of which the Seaside Grasshopper below.
Seaside Grasshopper.
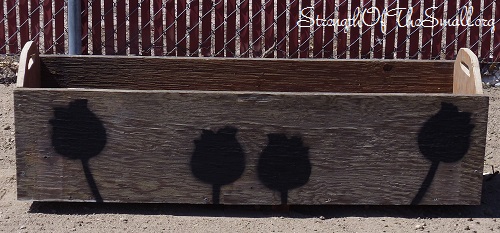
Four years ago, we harvested a couple of Mint Plants from a family friend. We brought them home and they took off as soon as we planted them. We knew little about growing this plant and we were so overwhelmed when they invaded pretty much everything around them. We thought we had removed all of it until last month when they began growing from the roots. I dug up one new shoot and planted it next to a mini rose bush. It has grown so much that I asked my husband to build a planter just for it. Growing up, my Mom used Mint in the kitchen all the time and I loved the smell. So, growing it not only remind me of the good times, but it also gives me an opportunity to introduce it to my children. Click here to learn about Mint benefits and here to find recipes.
Primitive Planter.
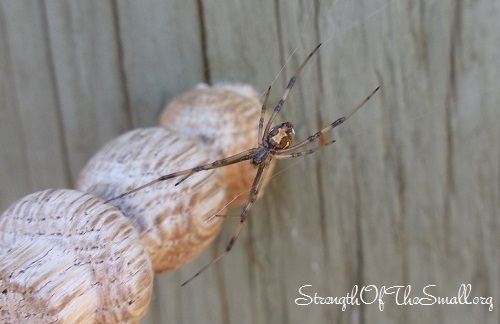
I found a Tan Brown Widow Spider on one of the birdhouses we built. It seemed to have appropriated the birdhouse. According to the Center for Invasive Species Research, University of California Riverside, the Brown Widow Spider, Latrodectus Geometricus, became established in Southern California in early 2000 and has become well entrenched as part of the local spider fauna in urban Los Angeles and San Diego. The brown widow spider is continuing its expansion in Southern California and could possibly move northward into Central California. Click here to read the complete article and click here to learn to identify this spider.
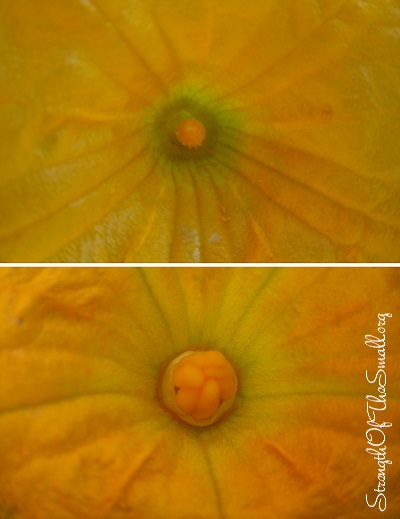
I haven’t seen a single bee around since last month and I don’t know if they will be coming back any time soon. Meanwhile, my female flowers need to be pollinated in order for the buds to become a pumpkin. Yesterday I pollinated the first female flower by hand. I figured that since pollination is the transfer of pollen from the anthers of a flower to the stigma of the same flower (or a different flower); then perhaps I could just cut the male flower, remove its petals and rub the male stamen’s pollen over the female stigma.
The pollinating process reminded me of all the things we often take for granted because someone of something else is in charge. Can you imagine how stressful life might become without the assistance of the bees? Can imagine hand pollinating each and every single one of your crop by hand? Let’s all help save the bees, starting with these 10 Simple Things YOU Can Do and clicking here to sign a petition to ban chemicals.
Male & Female Pumpkin Flowers.
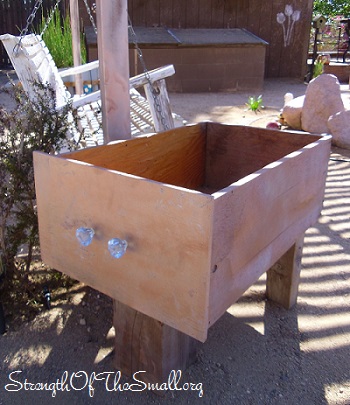
Yesterday, amongst other things, I found two Drawers from our old Kitchen Cabinets, which I cleaned and removed the knobs. I asked my husband to cut and attach three legs to its base and then spray paint the finish product. I replaced the original knobs with a set of drawer pulls I bought from Michael’s a few months ago.
Drawer Garden Planter.
I spent a peaceful moment in the garden today. I am off to spend a relaxing evening with the family.
By now some of you must have noticed our fondness for Primitive Decor. I love the simplicity and uniqueness of Primitive pieces. I love how charming a space looks and feels when all the right pieces come together. Our Backyard holds a lot of handmade Primitive pieces, all of which I build myself.
In April we made a Garden Sign after gathering all the necessary materials.
The Piece of plank I used was from an old wood platform on which a metal storage shed stood. It was already broken when we found it while dismantling the shed. I knew it would someday come handy and I set it aside.
Materials/Tools Needed
Step by step
Wood Chop Saw
Scrap/Reclaimed Wood
Nails/screws
Drill, Drill-bits
Letter Stencils
Spray Paint
Mini Garden Tool
Swing Hook Kit
Decide on the size of your Sign
Measure and cut your wood
Using your stencils, spray paint your message on the wood
Place your Fork on the wood and drill two holes on each side of the Fork
Loop a wire or cable/zip tie around it to secure the Fork
Pre-drill and insert the hooks into the woods top frame
Attach hooks to the hanging location and hang your sign
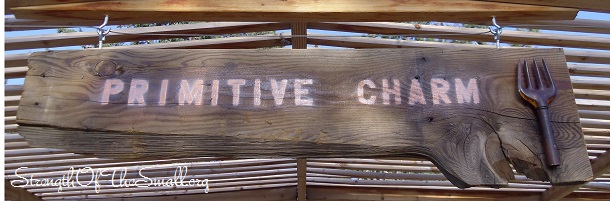
‘Primitive Charm’ Garden Sign.
For this project, I used Permatex® Copper Spray-A-Gasket® Hi Temp Adhesive Sealant for the letters. The main reason was that regular paint/spray paint was getting absorbed by the wood. It turned out that Copper Spray-A-Gasket fills minor surface irregularities, hot spots, surface imperfections, can withstand high temperatures and resist fluids which in this case was perfect for my outdoors sign.
After building the Sign, we found a Vintage Hand Fork while visiting Linda Marie’s Enchanted Treasures. The Vintage Garden Hand Fork is entirely made of metal. The Fork originally had a weathered yellow patina color as well as some wear and surface rust. To preserve its rustic feel, I sanded it a little, applied some clear coat on it for a shinning finish and to protect it from the elements. I think it complements the sign beautifully.