Building

DIY: Reclaimed Wood Pergola

EPEngineer By EPEngineer2 min read1.3K views

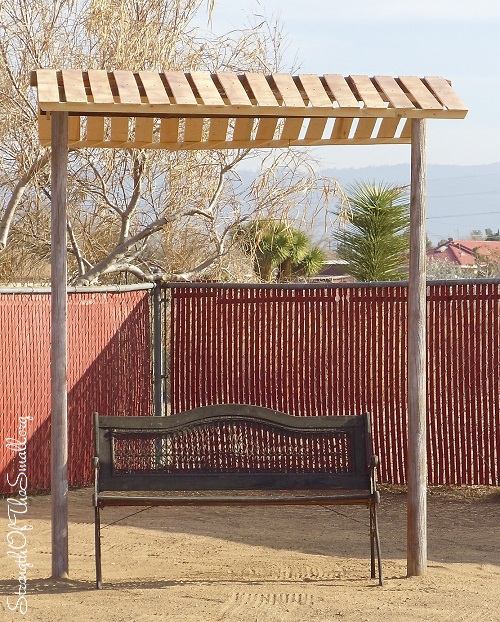
This afternoon we finished putting together a Pergola we built entirely from reclaimed wood and pieces of a dismantled wooden pallet. We decided on a canopy that not only provided some shade, but also resemble that of a water well in case we decide to change the design later on.

Mini Pergola.
Mini Pergola.

Materials/Tools Needed:

  • Scrap/Reclaimed Wood
  • Screws
  • Drill, Drill-bits
  • Cement
  • Bucket/Cement working tools
  • Spray Paint/Paint/Stain
  • Wood Chop Saw
  • Wood File

Step by step:

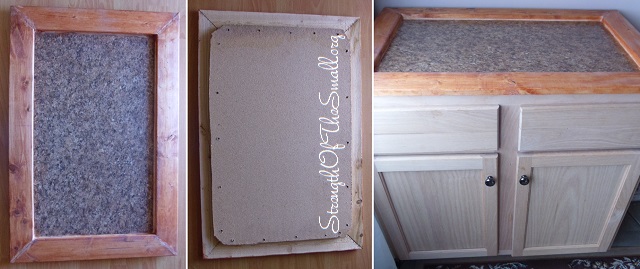
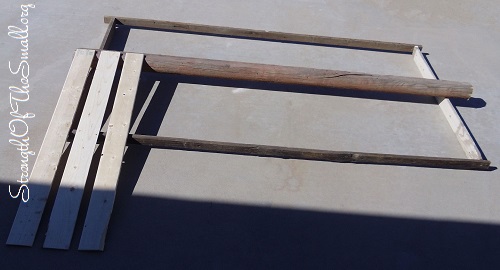
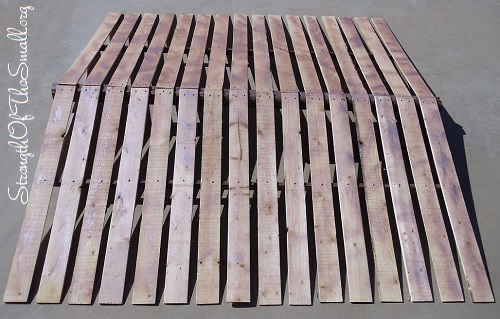
  • We used screws to fasten the pieces of wood together and used a scrap piece of wood to keep the spacing between pieces even. Once done we sprayed the top to give it a slightly weathered look.
Building The Canopy.
Building the Canopy.
Canopy.
Canopy built before the raising.
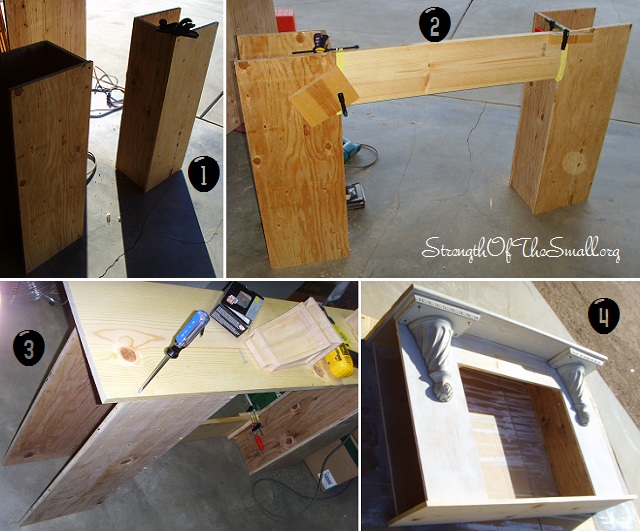
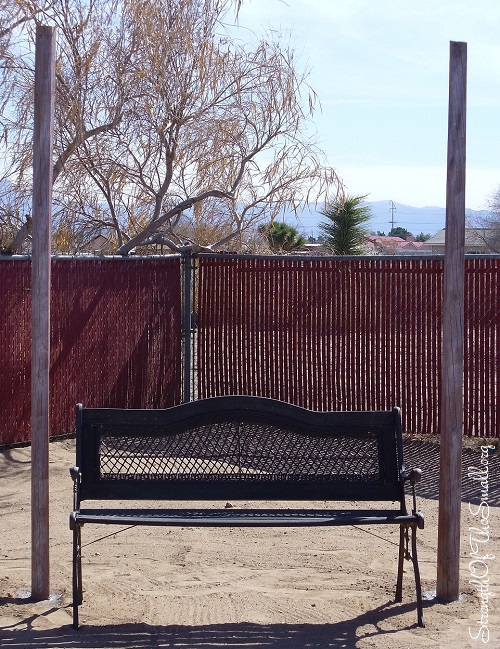
  • Once the canopy was finished we measured the distance between the two ends of the canopy to determine the post spacing. The measurement was then used to dig the holes according to the spacing. We used almost a whole 90 lb bag of cement to secure the posts. All we did was dig the holes, add water to the cement after pouring some in the bucket and mixed it. We poured it onto the hole and inserted the post making sure to keep it straight. We repeated the same steps for the second post and used a rope to tie the two posts together to maintain the spacing.
  • After 20 hrs of drying the cement was ready to take the weight of the canopy so we proceeded to lift it and place on top of the posts. We used 10 inch screw to screw the cross-piece of the canopy onto the top of the post after using a drill bit to drill a hole to guide the screw. Once screwed in, we finished fastening the rest of the canopy and did the finishing details.
Pergola Posts.
Pergola Posts.

A weekend project that we will enjoy for years to come.

DIY: Uses of Laminate

EPEngineer By EPEngineer2 min read2.5K views

You bought Laminate for your Kitchen Counter tops and you have some left overs. What to do now that your project is complete? Do you get rid of your leftovers or save them for craft projects? When it comes to Laminates, the possibilities are endless. You could use your leftovers to build a play table for your kids, a garden table for your tools, an outdoor platform, a plant sand, an end table, a frame to hang your jewelry, Wall Art, Bookshelves, Cabinets, Coasters, create a Book Cover and so much more.

For our Kitchen renovation four years ago, we ended up with an extra base cabinet we couldn’t return and we had some leftover from the counter top. After almost a year of having both items sitting in the garage, we decided to build a custom counter top for the base cabinet and use as extra storage in the Patio.

Custom Countertop.
Custom Counter top.

Materials/Tools Needed:

  • Counter top piece
  • Wood (to build a frame)
  • Wood Screws, Power Drill, Drill Bits
  • Silicone Sealer (to seal the gaps)
  • Stain (for the Wood)
  • Heavy Duty Staple Gun and Staples

Step by step:

  • First step is to measure out the size of the piece that will be needed. I used a cutout from my counter top which came from the sink cutout. Since it was about 30 inches wide and the cabinet 34 inches, I used the wood to expand on all 4 sides.
  • Based on my dimensions I cutout the four pieces to make a frame leaving enough of a lip to be able to screw them onto the counter piece.
  • I used the staple gun to secure all four corners together, then used the Power Drill to screw the frame onto the counter piece.
  • I used the sealer to fill in the gaps on the frame and between the frame and counter piece. This will stop any liquids from seeping onto the wood cracks.
  • The wood stain was used last and will go over the whole frame. You can also use it on the counter piece to give it a darker look.
  • The last step is to secure the whole piece onto the cabinet being used and enjoy!

Checkout what others have accomplished using Laminate.

1. The Armadillo Chair. 2. Contemporary Wood Wall Light. 3. Bent Laminate Modular Form.

1. The Armadillo Chair. 2. Contemporary Wood Wall Light. 3. Bent Laminate Modular Form.

Love the Laminate/Wood Lampshade in the middle picture? You can make your own by clicking here and following the steps for this Wood Veneer Lampshade.

.

DIY: Fireplace Mantel

EPEngineer By EPEngineer2 min read3.1K views

Once upon a time, our old house was equipped with a gas fireplace (possibly double sided). Somewhere along the way, one owner decided that a Wall Heater would serve the needs of his family best. So, he removed the fireplace and replaced it with a wall heater and added a second wall heater in the hallway.

Now, as the owners of this house, we have decided to remove the wall heaters and add an electric fireplace (restoring what used to be). Early this year we purchased a Wall Mount Electric Fireplace and we decided to build a Mantel around it. So, after much procrastination, we decided to buy the necessary supplies to start building. That was on Friday. Yesterday, I started cutting and putting the pieces together. Today, I filled in the holes and cracks with plaster and sanded it down in preparation for painting. They are still a couple more minor things to do before it’s finished; however, you can see what it will look like from the picture below.

Vintage Wall Sconce Corbel & Raw Maple Corbel.

The White Vintage Wall Scone was purchased a couple of months ago in Downtown Pomona, at the Pomona Antique Mart. The Raw Maple Corbel was from Lowe’s. Though we love each pair of sconce equally, the Vintage Sconce stood out the most and complimented the Fireplace beautifully.

Materials/Tools Needed:

  • Wire Brush
  • Screwdriver
  • Tape Measure
  • Chop Saw
  • Router & Bits
  • Paintbrush, Tape, Paint or Spray Paint for the Mantel
  • Plaster
  • Stud Finder
  • Drill, Drill-bits and Wood Screws
  • Clamps (for holding the wood in place)
  • Hammer
  • Level
  • Black heat-resistant paint for the firebox
  • Sandpaper
  • Wood Glue
  • Wood Filler
  • Ornamental door Molding
  • Wall Sconce Corbel

Step by step:

DIY Fireplace Mantel (Step by Step).
DIY Fireplace Mantel.

The two sides have shelves to hold DVDs and CDs measuring 8 inches wide by 11 inches deep and 34 inches high. The opening is 32 inches wide by 26 inches tall. overall it stands 60 inches wide, over 12 inches deep and about 36 inches tall.

DIY Fireplace Mantel.

I used Krylon Brushed Metallic Paint (Sparkling Canyon) spray paint for the Fireplace Mantel.

If you are interested on making your own, do not hesitate to contact me for the plans on this build.