Home Improvement

DIY: Footstool Reupholstered

JM Perez By JM Perez2 min read919 views

Last month, while visiting my favorite Vintage Shops here in the High Desert, I decided to make a quick stop at the Estate Liquidators. I have found so many beautiful vintage choice pieces here and I purchased a small vintage footstool that same day. What I love the most about this little beauty is its primitive feel.

Reupholstered 4-Legged Vintage Footstool.

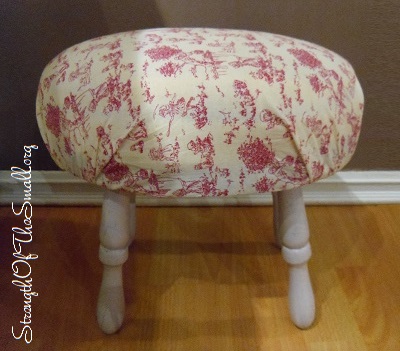
Today I gave it a makeover with a new coat of paint and a pink Toile de Jouy fabric.

Small Vintage Footstool.
4-Legged Vintage Footstool.

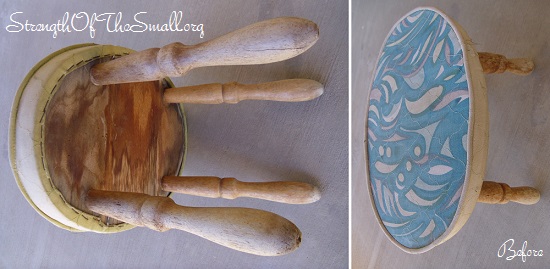
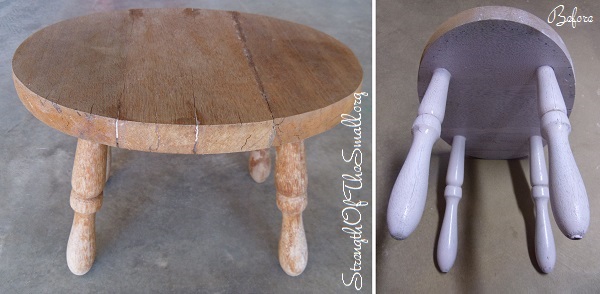
I started by carefully removing the staples that were holding the fabric in place and took off the old upholstery fabric. I found some light cracks here and there, which I patched up with wood glue (which also helped fill out the gaps and secure the pieces), letting it dry. I then proceeded to sand and clean the stool to get it ready for the painting.

4-Leg Vintage Footstool.
4-Legged Vintage Footstool.

Materials Needed:

  • Staples and Heavy Duty Stapler
  • Foam
  • Batting (to cover your Foam)
  • Spray Adhesive (to keep your Foam in place)
  • Choice Fabric for Bow
  • Scissors (to trim the excess Fabric)
  • Flat-head Screwdriver and Pliers (to lift up the staples and pull them out).

Optional:

  • Button Cover Kit
  • Drill and Drill Bits (to drill holes in your Foam and Wood)
  • Upholstery Thread
  • Sharpie (to mark holes on the wood)
  • Decorator Needles

Step by step:

  • Mark your hole on the wood where you want your button to go and drill a hole using your drill and drill bit.
  • Cut your foam to the size and shape of the wood.
  • Spray adhesive on the wood to keep the foam in place.
  • Use your batting to secure the foam to your wood with a staple gun.
  • Place and attach your fabric over the foam and start stapling.
  • Cover your button with the same fabric.
  • Run some thread through the button and push the threaded needle up through the pre-drilled hole (once satisfied, staple the thread at the bottom of the wood to secure and hold it in place).
Reupholstered 4-Legged Vintage Footstool.

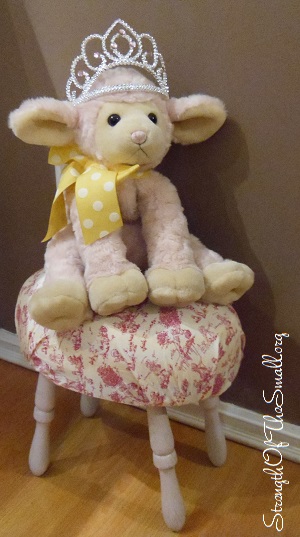
I love how it turned out and my daughter now has a new reupholstered footstool for her dolls.

Linking up to Beverly’s Pink Saturday.

DIY: Eliminating an Outdoor Faucet

EPEngineer By EPEngineer2 min read662 views

One of my outdoor faucet pipes has been leaking for a couple of months now from last Winters frost. It wasn’t so much a leak, but a couple of drops per every 5 hours or so every now and then from the rusted pipe, not the spigot. It turns out that whoever installed the faucet thirty-eight years ago decided to use a smaller pipe rather than a regular 3/4 inch spigot and because of that the smaller pipe started to get rust which ate thru the outer layers and slowly started to allow water to sweat out.

Damaged Outdoor Faucet.

First things first, I made sure I had all my tools and supplies on hand. I had everything except for the Galvanized Plug Fitting which I bought from Lowes.

Materials/Tools Needed:

  • Pipe wrenches (various sizes)
  • Teflon Tape
  • Mueller Proline 3/4-in Dia Galvanized Plug Fitting
  • Additional tools may be required depending on the type of faucet/tap you have.

Step by step:

  • I turned off the water to the whole house from the street.
  • Using a pipe wrench, I twisted the pipe off where the bigger pipe was adapted onto the smaller pipe which luckily, didn’t break.
  • Using a brush, I cleaned the interior of the pipe and I also cleaned off any rust or debris on the threaded fittings on the wall pipe.
  • I wrapped a few layers of Teflon Tape around the threads of the galvanized plug (this is very important as it ensures that no water leaks out).
  • I screwed the new galvanized plug onto the pipe by hand until it tightened and then used the appropriate wrench to tighten the fitting real tight.
  • I turned the water back on and checked that there was no leak.
Outdoor Faucet Eliminated.

For added precautions, I also picked up insulation for my other outdoor faucets to protect them from the Winter freeze. I am glad that everything worked for the best as this brings peace of mind.

Shabby Chic Wall Candle Holder

JM Perez By JM Perez1 min read677 views

What a lovely day and an awesome weather we are having here in the High Desert. I was outside earlier bringing in the trash can and I stopped for a moment and admired my garden. The plants are thriving and blossoming with beautiful, bright, colorful flowers and the bees are actively pollinating. If I owned a Hammock Chair, this would have been the ideal time to sit and relax in the mist of these beauties. Nature never ceases to amaze me.

On a much happier note, I finally found some time to get around decorating my Shabby Chic Wrought Iron Wall Candle Holder with prisms. After almost a year of having it around and locating a few prism I had stored around the house, I can proudly say that I am close to finishing my little project.

Shabby Chic Wall Candle Holder.

I bought the Shabby Chic Wall Candle Holder at the Carriage House Antiques in Hesperia, CA last year while visiting the shop. I am a huge believer that with patience and determination we can turn ugly into fancy.

Address Location:
11370 Hesperia Rd Hesperia, CA 92345
Phone: 1 (760) 948-5577
Website: Carriage House Antiques
Like on Facebook

Hours of Operations:
Monday – Saturday: 10:00 AM – 5:00 PM
Sunday: 11:00 AM – 5:00 PM

If like me, you love decorating with Crystal prisms and you are looking for great deals, click here for crystal parts and trimmings. Click here to learn How to Decorate With Prisms and here to learn How to Clean them.

Vintage Wood Folding TV Tray

JM Perez By JM Perez2 min read971 views

Last month, our wonderful neighbors across the street gave us a gorgeous 1970′s Vintage Sea Shell Hanging Planter along with a Vintage Wood Folding TV Tray. The folding tray originally had a mahogany color and Saturday being a warm day, we decided to paint a few items (re-purposing our vintage stainless steel metal tray for instance) and giving the folding tray a makeover. I am happy with the new color choice.

Vintage Wood Folding TV Tray.

We cleaned the tray with soap and water to get rid of any dirt so that the paint will latch on evenly. It had a couple of spots that needed a little tightening as well, to stop it from wiggling. The latching clamp was a little loose and had to be bent back into shape. After this, we sanded a couple of spots on it, cleaned it once again and let dry in the sun. After half an hour it was ready for the spray paint which I applied in layers to keep it from running.

After spray painting the wood a Satin Granite color (by Rust-Oleum) and affixing a stencil on to the top area, we proceeded to apply a clear coat on the surface to keep it nice and shiny as well as protecting the surface from the elements. An area around the stencil began bubbling, leaving some marks on the surface. Not knowing how to proceed and refusing to sand the area down, I decided to take it as it was. Now I actually find it quite lovely.

DIY: Vintage Chalkboard Tray

JM Perez By JM Perez2 min read486 views

What can you do when you own a gorgeous vintage piece that you either don’t use often or can’t use for its original intent? For one you could re-purposed the item to meet your needs.

Well, I have been wanting to make some chalkboard for my kitchen and I thought it would be great on a tray. At the same time, I was looking for a vintage metal tray and was lucky enough to find one out at the Estate Liquidators in Hesperia, CA. I instantly fell in love with this lovely Stainless Steel Vintage Tray with charming gold handles (to top it all of, it was brand new and still in its original packaging).  I knew at that moment that I had just found what I have been looking for: a plain and simple metal tray.

Vintage Chalkboard Tray.

Today, I finally decided to re-purposed my stainless steel vintage metal tray and it turned out great.

Materials/Tools Needed:

  • Metal Serving Tray
  • Chalkboard Paint/Spray Paint
  • Paintbrush/Sponge brush (if you’re using Paint and not Spray Paint)
  • Painter’s Tape (if you’re not planning to paint the whole tray)
  • Vinegar (to prevent the paint from chipping)

How to proceed:

  1. Clean/sand your tray (if needed).
  2. Clean the area you need painted with vinegar to insure that your paint doesn’t chip.
  3. Tape the borders (if you’re not planning on painting the whole tray).
  4. Start painting in a well ventilated area and let it try at least one hour.
  5. When you’re done and satisfied, remove the tape around the borders.

Now that your chalkboard tray is complete, you can write/draw on it and display it in your favorite place with pride. I hope you enjoy yours as much as I am enjoying mine.