DIY: Primitive Garden Table

EPEngineer By EPEngineer1 min read556 views

Today we decided to make use of a spare door that was laying around our storage shed. Since my daughter has been very eager to help out in the garden, I thought she would enjoy an area where she can create her own container garden. This will give her opportunities to learn about plants and how to grow them. She will also have more responsibilities in the garden as she takes pride in tending to her plants.

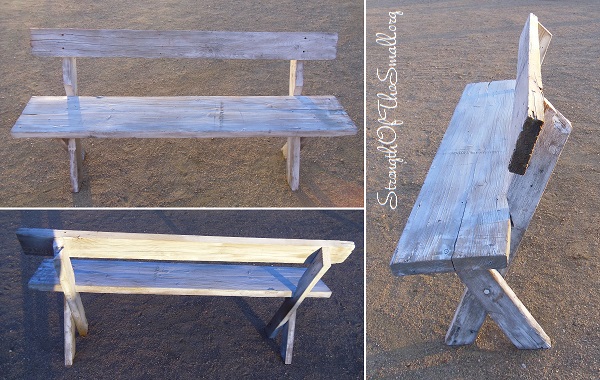
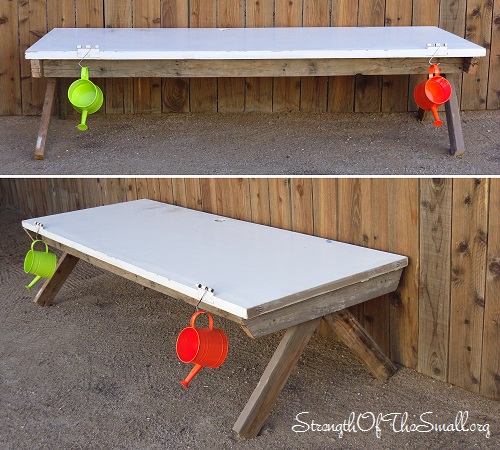
Being that the door is hollow in the middle I had to reinforce the edges to hold the weight it will need to hold. The base is a big rectangle that allows me to screw onto the wood pieces that are inside the door for added strength. The legs I cut onto an upside down V and screwed it to the inside of the rectangle. You can see from the pictures below how everything fits together.

Materials/Tools Needed:

  • Old Door
  • Scrap/Reclaimed Wood
  • Screws
  • Drill, Drill-bits
  • Spray Paint/Paint/Stain
  • Wood Chop Saw
  • Wood File
Primitive Garden Table.
Primitive Garden Planting Table.

My wife has always involved our children in selecting plants and lending a pair of hands or two in the garden. We will be visiting a few nurseries this weekend and we hope they will have a wonderful time choosing beautiful plants, accessories and additional gardening tools.

Allowing children to do things on their own fuels their desire to learn more and achieve more.

DIY: Reclaimed Wood Pergola

EPEngineer By EPEngineer2 min read1.3K views

This afternoon we finished putting together a Pergola we built entirely from reclaimed wood and pieces of a dismantled wooden pallet. We decided on a canopy that not only provided some shade, but also resemble that of a water well in case we decide to change the design later on.

Mini Pergola.
Mini Pergola.

Materials/Tools Needed:

  • Scrap/Reclaimed Wood
  • Screws
  • Drill, Drill-bits
  • Cement
  • Bucket/Cement working tools
  • Spray Paint/Paint/Stain
  • Wood Chop Saw
  • Wood File

Step by step:

  • We used screws to fasten the pieces of wood together and used a scrap piece of wood to keep the spacing between pieces even. Once done we sprayed the top to give it a slightly weathered look.
Building The Canopy.
Building the Canopy.
Canopy.
Canopy built before the raising.
  • Once the canopy was finished we measured the distance between the two ends of the canopy to determine the post spacing. The measurement was then used to dig the holes according to the spacing. We used almost a whole 90 lb bag of cement to secure the posts. All we did was dig the holes, add water to the cement after pouring some in the bucket and mixed it. We poured it onto the hole and inserted the post making sure to keep it straight. We repeated the same steps for the second post and used a rope to tie the two posts together to maintain the spacing.
  • After 20 hrs of drying the cement was ready to take the weight of the canopy so we proceeded to lift it and place on top of the posts. We used 10 inch screw to screw the cross-piece of the canopy onto the top of the post after using a drill bit to drill a hole to guide the screw. Once screwed in, we finished fastening the rest of the canopy and did the finishing details.
Pergola Posts.
Pergola Posts.

A weekend project that we will enjoy for years to come.

Day Trip to Barstow, CA

EPEngineer By EPEngineer1 min read1.7K views

This morning we took a trip to the DMV in Barstow, CA and we were impressed. Everything we heard about this Office is true. If you live in the High Desert of California and need to visit a DMV Office in person rather than pay online; I highly recommend the Barstow DMV Office. The facility is smaller than the one in Victorville with fewer , yet efficient employees. The service is amazing with shorter lines and wait time. It’s truly worth the drive.

On our way to the DMV Office, we spotted a Preserved Tank at The Rotary Centennial Park.

M47 Patton Tank.
M47 Patton Tank (Preserved Tank).
Rotary Centennial Park, Barstow, CA.
.
M47 Patton Tank (Preserved Tank).
Rotary Centennial Park, Barstow, CA.
Atchison, Topeka and Santa Fe Caboose 999093 CE-1.
Atchison, Topeka and Santa Fe. Caboose 999093 CE-1.
Rotary Centennial Park, Barstow, CA.
.
Atchison, Topeka and Santa Fe. Caboose 999093 CE-1.
Rotary Centennial Park, Barstow, CA.
Rotary International Marker.
Rotary Centennial Park, Barstow, CA.

If you are traveling on Historic Route 66, make plans to visit the Rotary Centennial Park in Barstow, California as well as other attractions within and around the City.

Located at the northeast corner of Barstow Road and Virginia Way in Barstow, California, the Rotary Centennial Park was constructed by the Rotary Club of Barstow in recognition of Barstow’s Centennial year, 1986.
Click here to learn more.

DIY: Primitive Wood Bench

EPEngineer By EPEngineer1 min read774 views

I enjoyed spending the whole day with my family outdoors today as I watched my kids running around the backyard, giggling while hunting for Grasshoppers as I was building a second Reclaimed Primitive Wood Bench. These are the days we cherished the most since the cold weather is setting in slowly but surely and we might not have an opportunity to spend time outdoors until next year.

Materials/Tools Needed:

  • Scrap/Reclaimed Wood
  • Screws
  • Drill, Drill-bits
  • Spray Paint/Paint/Stain
  • Wood Chop Saw
  • Wood File

Step by step:

  • Decide how big or small you want your bench to be
  • Decide on the design of the legs (for my bench I decided on a 30 degree angle for the cut on the legs since the bench is not deep)
  • Measure and cut your wood
  • Screw your pieces together
  • Using a wood file, file the rough/sharp edges of the wood to prevent splinters
  • Wash the bench to ensure that the paint will stick to the wood
  • Let dry and paint or stain
Reclaimed Primitive Wood Bench.

I hope you find this tutorial helpful and get creative building yours.

DIY: Eliminating an Outdoor Faucet

EPEngineer By EPEngineer2 min read664 views

One of my outdoor faucet pipes has been leaking for a couple of months now from last Winters frost. It wasn’t so much a leak, but a couple of drops per every 5 hours or so every now and then from the rusted pipe, not the spigot. It turns out that whoever installed the faucet thirty-eight years ago decided to use a smaller pipe rather than a regular 3/4 inch spigot and because of that the smaller pipe started to get rust which ate thru the outer layers and slowly started to allow water to sweat out.

Damaged Outdoor Faucet.

First things first, I made sure I had all my tools and supplies on hand. I had everything except for the Galvanized Plug Fitting which I bought from Lowes.

Materials/Tools Needed:

  • Pipe wrenches (various sizes)
  • Teflon Tape
  • Mueller Proline 3/4-in Dia Galvanized Plug Fitting
  • Additional tools may be required depending on the type of faucet/tap you have.

Step by step:

  • I turned off the water to the whole house from the street.
  • Using a pipe wrench, I twisted the pipe off where the bigger pipe was adapted onto the smaller pipe which luckily, didn’t break.
  • Using a brush, I cleaned the interior of the pipe and I also cleaned off any rust or debris on the threaded fittings on the wall pipe.
  • I wrapped a few layers of Teflon Tape around the threads of the galvanized plug (this is very important as it ensures that no water leaks out).
  • I screwed the new galvanized plug onto the pipe by hand until it tightened and then used the appropriate wrench to tighten the fitting real tight.
  • I turned the water back on and checked that there was no leak.
Outdoor Faucet Eliminated.

For added precautions, I also picked up insulation for my other outdoor faucets to protect them from the Winter freeze. I am glad that everything worked for the best as this brings peace of mind.