DIY: Primitive Garden Sign

EPEngineer By EPEngineer2 min read589 views

By now some of you must have noticed our fondness for Primitive Decor. I love the simplicity and uniqueness of Primitive pieces. I love how charming a space looks and feels when all the right pieces come together. Our Backyard holds a lot of handmade Primitive pieces, all of which I build myself.

In April we made a Garden Sign after gathering all the necessary materials.
The Piece of plank I used was from an old wood platform on which a metal storage shed stood. It was already broken when we found it while dismantling the shed. I knew it would someday come handy and I set it aside.

Materials/Tools Needed Step by step
  • Wood Chop Saw
  • Scrap/Reclaimed Wood
  • Nails/screws
  • Drill, Drill-bits
  • Letter Stencils
  • Spray Paint
  • Mini Garden Tool
  • Swing Hook Kit
  • Decide on the size of your Sign
  • Measure and cut your wood
  • Using your stencils, spray paint your message on the wood
  • Place your Fork on the wood and drill two holes on each side of the Fork
  • Loop a wire or cable/zip tie around it to secure the Fork
  • Pre-drill and insert the hooks into the woods top frame
  • Attach hooks to the hanging location and hang your sign
Primitive Garden Sign.
‘Primitive Charm’ Garden Sign.

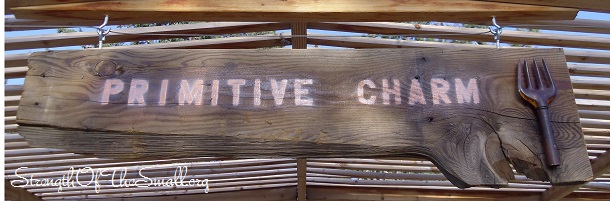
For this project, I used Permatex® Copper Spray-A-Gasket® Hi Temp Adhesive Sealant for the letters. The main reason was that regular paint/spray paint was getting absorbed by the wood. It turned out that Copper Spray-A-Gasket fills minor surface irregularities, hot spots, surface imperfections, can withstand high temperatures and resist fluids which in this case was perfect for my outdoors sign.

After building the Sign, we found a Vintage Hand Fork while visiting Linda Marie’s Enchanted Treasures. The Vintage Garden Hand Fork is entirely made of metal. The Fork originally had a weathered yellow patina color as well as some wear and surface rust. To preserve its rustic feel, I sanded it a little, applied some clear coat on it for a shinning finish and to protect it from the elements. I think it complements the sign beautifully.

Fun Afternoon at Huntington Beach

EPEngineer By EPEngineer2 min read568 views

“The Sea, once it casts its spell, holds one in its net of wonder forever.” ― Jacques Cousteau

After weeks of planning and postponing, my wife finally made arrangements with our friend Evelyne, to meetup at her place in Buena Park, CA and then spend the rest of the day at the Beach. After much anticipation and a good weather, we decided to drive down since we figured there would be less people after the holiday. On our way there we spotted so much traffic left and right that I was afraid the days activity would not happen.

After spending about an hour at our friend’s apartment catching up on events and waiting for the arrival of a friend of hers, we then made our way to Huntington State Beach. It took us about twenty minutes to get there. After what seemed like an hour waiting in line to get in, we finally made it. It was packed, yet roomy since people where keeping to their activities and not running around as much. We found a location and set up. To our amazement, the weather was surprisingly warm and we didn’t have to cover up until much later.

Huntington State Beach Sign.
Father and Children on the Beach.
Exploring with my Kids.

We had brought shorts and shirts to get in but when we got out of the car we felt the fresh cool air and decided to go as we where (less chances of getting sick). I had an awesome time with my kids. We fought and ran away from waves, found some shells and even got to catch some Sand Crabs on a foam cup. After having some fun watching them bury themselves on the little dirt inside the cut, we released them so they would not die. The Seagulls where very interested on our activity since they figured an easy dinner was to come.

Seagulls on the Beach.
Lone Sailboat.
Lone Sailboat.

It was a nice cloudy day and the breeze was inviting up to the point where it started to get cold. I had almost forgotten the feeling with all the heat we are having at home. We said our goodbyes to friends who came with us and left our sand castles behind for the birds to take over. The journey back home was as scenic as the drive away from it was. Being here for the day reminded us of the many times we have made the same drive and how it’s never the same each and every time. I am looking forward to the next time we find ourselves there again.

Being Accountable

EPEngineer By EPEngineer2 min read578 views

“Nobody can hurt me without my permission.”― Mahatma Gandhi

This morning after trash pickup, I heard music coming from my next door neighbor’s front porch. With temperatures soaring lately, I’ve stayed indoors mostly. Since I was outside, I decided to check on him. We talked, we laughed and we talked some more. As we stood at our property boundary, my neighbor handed me a piece of paper with his new phone number written on it. He said he let an acquaintance used the phone to make a quick call and she drove off with it. He’s lost his laptop as well as other electronics in the same manner.

My neighbor is a good man who needs attention and he is honest about it. He is a compulsive shopper. He is very disorganized, which causes him to forget where he left items; therefore, when he needs an item he is forced to purchased another set. Every now and then we will help him organize/declutter his garage and label all his tools. It’s never enough. He keeps buying and some keeps disappearing. He lets people use his tools and equipments without supervision and give full access to his tenants. I told him that he had no one else to blame but himself.

Image Source: LifeQuotesCollection.com

From the moment they started talking, I have been teaching my children Accountability.
They know that for every action, there’s a consequence. They understand the concept of ‘reaping what you sow,’  fighting fair and always striving to do the right thing.

  • When you shoot something up, expect it to fall down
  • When you give, give freely and don’t expect anything in return
  • Remember that loving someone doesn’t guarantee they will love you back
  • Do no use others for your personal gain
  • Guard your thoughts and watch your mouth
  • Nurture good habits
  • Don’t tell your secrets and hope they’ll remain secret: words have a way of getting out
  • Don’t look down on others and expect them to assist you in times of need
  • Even the smallest decision can have huge impact in your life
  • Be accountable for your own actions
  • Wrong doings tend to find you in the darkness

With this in mind it is always a good idea to offer everyone your good side and always smile kindly. There will be times when a stern word or two must be used, but remember that words tend to come back and hunt you. As a society we learn every day and we must navigate it carefully and truthfully with our best intentions always in mind.

DIY: Nautical Wooden Anchor

EPEngineer By EPEngineer1 min read2.1K views

Last year while visiting the shops up in Crestline, CA; we decided to check one more shop before driving back home. So, we stopped at the  Crest Forest Senior Citizens Thrift Shop (this little thrift shop has two levels and both are full of beautiful items. From books to household items and electronics, they have it all). While I took the kids to look at some books, my wife stayed behind and picked out a few things, including a Nautical Wooden Decorative Anchor. The Anchor was primed and came with a rope.

Nautical Wooden Decorative Anchor.

Materials/Tools Needed:

  • Wooden Anchor
  • Nylon rope
  • Glue gun
  • Hot glue sticks
  • Power Drill and Drill Bits (to make a hole)
  • Spay Paint
  • A Crab or a decorative piece of your choice

Step by step:

  • Use your Power Drill to make a hole on the Anchor (if needed)
  • Clean the wooden Anchor if needed
  • Spray paint
  • Secure the Anchor rope by inserting one end of the rope through the hole and hot gluing it. Then loop the rope around the Anchor and hot glue it at the base.
  • Hot glue the crab unto the base

Now that you’re done, place your Nautical Wooden Anchor somewhere you can see and admire it.

DIY: Primitive Slingshot

EPEngineer By EPEngineer1 min read1.9K views

I finally put together the Primitive Slingshot which I started working on almost half a year ago. I was hoping to find a perfect Y-shaped tree branch before putting it together. However, our encounter with some Squirrels lately have triggered the need to have some sort of device available to handle the issue.

Materials/Tools Needed:

  • A Y-shaped tree branch, Drumsticks
  • Saw (to cut down the branch)
  • Knife (to carve notches on a branch)
  • Awl (to punch holes toward the ends of the Nylon Webbing or the Leather Strip)
  • Paperclip (thread the rubber band through the holes)
  • Piece of Leather strip, Nylon Webbing
  • Rubber band, Latex Surgical Tubing
  • Dental floss or Zip Ties(to fasten the Tubing)

Step by step:

  • For this project I decided to use the surgical tubing, leather strip, Y-shaped tree branch and two zip ties. First I used the leather strip and cut a hole on each side to loop the surgical tubing thru it. Once that was done, I proceeded to prepare the y shaped branch by removing any bumps from the handle.
  • Now I used the zip ties to fasten each surgical end to each post of the Y-shaped branch; making sure it’s nice and tight so that it does not come loose and cause any injuries.
  • Test out the sling shot for functionality and make sure that no adjustments are needed.
Primitive Slingshot.

Now that this Slingshot is operational, I am hoping to scare a couple of Squirrels away.