Today we worked on our third Family project for my Son’s assignment and it was a fun Family affair.
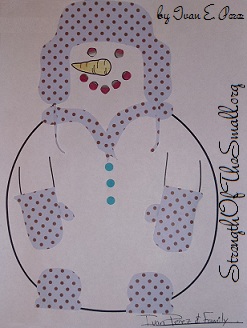
I gathered all the tools and materials necessary to complete the project (scissors, scrapbook papers, hole puncher, crayons, paper bits and Elmer’s glue) while my little guy was busy writing the last entry of the week activities in his school journal. He wanted the Snowman to have matching beanie hat, scarf, gloves and boots. I opened my hole puncher collection area and collected the bits from the punched papers, which we used for the Snowman’s eyes, mouth and buttons for his rather large coat. We tried to keep it clean and simple as possible.
Snowman Decorating Project.
Today he received his fourth Pizza Hut® Book It!® Reading Program Certificate to celebrate another reading accomplishment. He is moving on to list nine of his sight words (though he can pretty much read anything). I ordered a bunch of books for them a few days ago. I can’t be more proud of my little boy! ♥
This is the first year I have raked leaves in January. Usually by mid-December, the leaves from every tree in our property are completely gone. Fall went by so fast that the leaves from certain trees didn’t get a chance to completely change colors and fall off. Thanks to the erratic weather we’ve had the last couple of weeks, the last of the leaves from our Sweet Almond tree finally fell off. Many people are also experiencing Fall rather than Winter as their trees are barely losing their leaves. Thanks to a warm and lovely weather this morning, I was outside raking up the fallen leaves and working on a few projects. When Nature surprises me, I seize the moment.
Last month I wrote a post on Rabbits and the damages they cause in the garden. The picture below is one of the four barrel planters they ate from. Today we build four plant stands for the barrel planters using dismantled pieces of wood and slabs we kept from the demolition of an old Stall a couple of years ago. I was not interested in anything fancy, just a simple plant stand, high enough to prevent the Rabbits (and possibly squirrels) from eating the plants. All you need is three pieces of wood, cut same size (the height is up to you) as well as a square piece of wood. You gather your three pieces standing up, making sure they form a triangle and then you place the square piece at the top of your triangle and screw them in (each screw must go into your individual pieces).
Once you’re done, you can decide to paint your finish product or leave it as is.
Primitive 3 Legged Plant Stand.
The final task of the day was to lay Chicken Wire around our Daffodils, Stella D’Oro Daylily and Hyacinth beds (we used tie-down stake to anchor the wire into the ground).
Growing up as a little boy, I was always fascinated by everything that could move.
While watching a kid show that involved Marionette, I got the idea to make my own. That crude design was bird-like in nature but it provided hours and hours of fun as well as the pride of knowing that it was one of a kind.
After my kids reminded me for the tenth time that they really, really wanted to do some craft; this project came to mind and I proceeded to scavenge the whole house for supplies. As with all my creations, I am not sure what I would need until I see it.
Materials/Tools Needed:
Toilet Paper Roll
Disposable Ear Plugs
Wooden Skewers
Metal Bottle Caps
Plastic Bottle Caps
Sewing Thread or Fishing Wire
Empty Krazy Glue Tube (for the neck)
Wire Cutters
Pliers
Power Drill and Drill Bits
Precision Knife/Blade
Materials & Tools Needed.
Step by step:
First get your Ear Plugs and cut off the cushion part to use as the eyes. Then cut the rope into 2 equal lengths which will be passed thru small holes made on the paper roll. Put a knot on each rope close to the paper roll so as not to have the rope move (See picture below).
Once done, drill thru the middle of the bottle caps so that you can pass the ear plug rope thru it and make a knot at the end to stop the cap from sliding out.
Now, get the 2 metal caps and drill thru the middle of them. Once done you will get the Foam plugs and make 2 holes thru the side so that they can be tied down (or hot glue them if you prefer). Loop a piece of black thread from the underside of one of the metal caps, thru the foam plug and back into the metal cap. Do the same for the second metal cap and foam plug and tie the two pieces together to form the head.
You will then make 2 small holes onto the Crazy glue cap and pass the black thread thru those and knot it together to hold the head in place. By now it should look like the picture below.
Now, take your 2 skewers and cut off the sharp end and discard the sharp ends. Use your black thread to make either of the 2 designs pictured above for the handle. Once done you are ready to tie everything together.
Make a hole onto the middle of the Crazy glue bottle and make sure it goes thru. Make 2 holes onto the paper roll to tie the head onto the body. As you pass the black thread from the paper roll thru the Crazy glue bottle and back thru the paper roll make sure that it’s all nice and tight. Once the thread is knotted you will leave some slack and tie it to your handle ( See below pics for reference).
Now that the first thread is connected you can start doing each leg individually. Drill the hole on the cap, knot the thread and take it up to the handle and fasten. Repeat for the rest of the legs and you are done.
Step by Step Instructions.
Once the parts have been successfully put together, it will look similar to the picture below.
Bug Marionette (Close Up).Bug Marionette.
Have a fun time making your own Bug Marionette and don’t hesitate to share the link for us to see your creation.
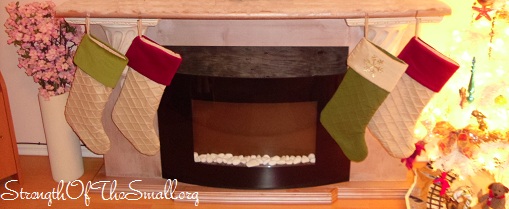
Yesterday we decorated the Fireplace Mantel, which is still a work in progress.
We set up and displayed the Nativity Scene, the Angels and Carolers, the Church and Village collection as well as other little displays. I had the Stockings lined up and when I was about to hang them up I couldn’t figure out where I left the hooks. Not knowing which box to look into and unwilling to search, I decided to create temporary hooks using old Wire Coat Hangers I had around (the ones you get from your Dry Cleaner).
Stocking Hook/Hanger.
Materials Needed:
Wire Coat Hanger or Sculpture Wire
Wire Cutters
Pliers (to bend wire)
Step by step:
First get the hanger and cut it close to the twist area. Once cut, you can bend the end onto a loop. I found that bending the end into a loop helps to eliminate the sharp edges.
Starting from the looped end measure about an inch and a half to two inches and bend onto a 90 degree angle. This will allow the hanger to latch onto the back of the surface it will lay at.
Straighten the hanger as you go along to to the desired length and make sure that you leave an extra two inches to loop back at the end.
Now you can shape the end that will hold the stocking according to the surface it will lay on top of. On our case the edge is rounded off, so I rounded the edge.
Now, fold back the extra two inches of the hanger and bend together facing up. Bend the rest of the hanger end the same shape and make sure that the end of the hanger is as close to the hanger as possible. Now you are done, Enjoy!
Once upon a time, our old house was equipped with a gas fireplace (possibly double sided). Somewhere along the way, one owner decided that a Wall Heater would serve the needs of his family best. So, he removed the fireplace and replaced it with a wall heater and added a second wall heater in the hallway.
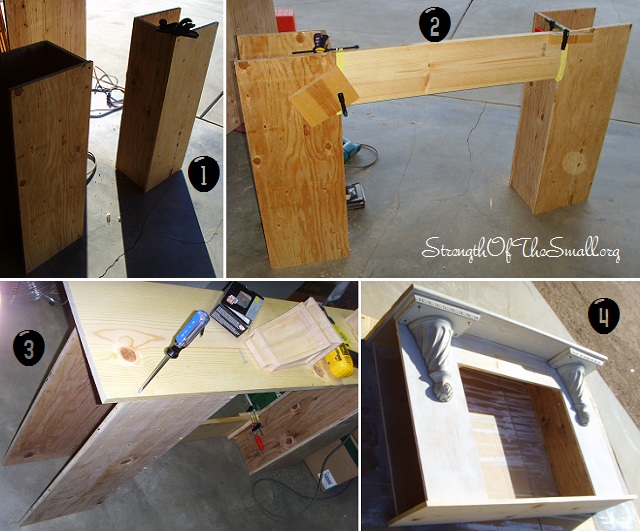
Now, as the owners of this house, we have decided to remove the wall heaters and add an electric fireplace (restoring what used to be). Early this year we purchased a Wall Mount Electric Fireplace and we decided to build a Mantel around it. So, after much procrastination, we decided to buy the necessary supplies to start building. That was on Friday. Yesterday, I started cutting and putting the pieces together. Today, I filled in the holes and cracks with plaster and sanded it down in preparation for painting. They are still a couple more minor things to do before it’s finished; however, you can see what it will look like from the picture below.
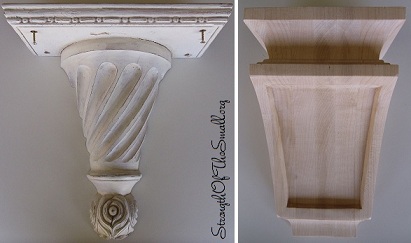
Vintage Wall Sconce Corbel & Raw Maple Corbel.
The White Vintage Wall Scone was purchased a couple of months ago in Downtown Pomona, at the Pomona Antique Mart. The Raw Maple Corbel was from Lowe’s. Though we love each pair of sconce equally, the Vintage Sconce stood out the most and complimented the Fireplace beautifully.
Materials/Tools Needed:
Wire Brush
Screwdriver
Tape Measure
Chop Saw
Router & Bits
Paintbrush, Tape, Paint or Spray Paint for the Mantel
Plaster
Stud Finder
Drill, Drill-bits and Wood Screws
Clamps (for holding the wood in place)
Hammer
Level
Black heat-resistant paint for the firebox
Sandpaper
Wood Glue
Wood Filler
Ornamental door Molding
Wall Sconce Corbel
Step by step:
DIY Fireplace Mantel (Step by Step).DIY Fireplace Mantel.
The two sides have shelves to hold DVDs and CDs measuring 8 inches wide by 11 inches deep and 34 inches high. The opening is 32 inches wide by 26 inches tall. overall it stands 60 inches wide, over 12 inches deep and about 36 inches tall.
DIY Fireplace Mantel.DIY Fireplace Mantel.
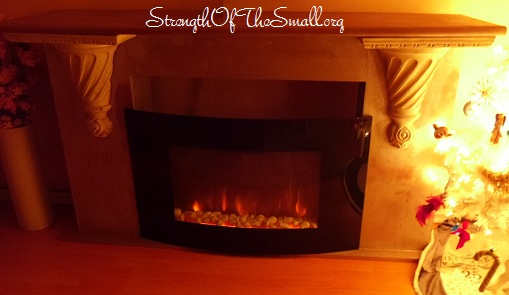
I used Krylon Brushed Metallic Paint (Sparkling Canyon) spray paint for the Fireplace Mantel.
If you are interested on making your own, do not hesitate to contact me for the plans on this build.


")
")