DIY: Projects

Statue Reconstruction

EPEngineer By EPEngineer2 min read654 views

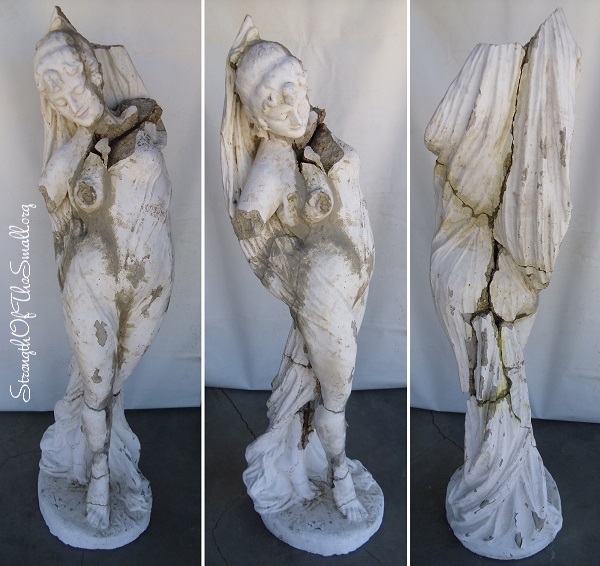
Five years ago, my wife found a beautiful Female Statue (Danza Del Flori by Giorgio Ceragioli) and knowing how much she loves statues and seeing the wonderful job she’s done surrounding our Home and Garden with relaxing zen sculptures, I agreed to get it for her. We paid for it and as we were about to load it into the back of the car, it collapsed and broke to pieces. After picking up all the pieces, we returned home with the promise to reconstruct it in the next following months. So days turned to weeks which turned to months and years went by.  About three years ago, I glue some of the major pieces, but that was all about it. Finally on Friday, I decided to resume the restoration process.

Statue Reconstruction.
Female Statue Reconstruction (Danza Del Flori by Giorgio Ceragioli).

Materials/Tools Needed:

  • Brushes
  • DAP Cement filler
  • Clear Tape
  • Paper
  • Scissors
  • Hacksaw with metal-cutting blade
  • Putty knife
  • Wire brush
  • Loctite Epoxy Resin
  • Dremel
  • Diamond bits

How to proceed:

  • Clean the pieces you plan to glue.
  • I used Loctite Epoxy Resin which sets in 5 minutes to glue it together. It holds up to 3,000 Psi and worked for my statue.
  • I position the pieces and check that they fit together. I use clear packaging tape to hold the pieces together before gluing them.
  • Once I had a big section done it gets added to the overall pieces which is where I am currently.
  • The arms will be the last to be added and then I will fill in the cracks using DAP Cement filler.

Once the pieces have been glued and filled in I will spray paint the statue and place it at a location of our choice.

DIY: Grass Pet {Making Shoes}

JM Perez By JM Perez1 min read606 views

A week and a half ago we decorated my Son’s Grass Head Pet.

After watering it and placing it on the kitchen window sill for some warm Sun light, it grew its first hair six days later. Today we spotted two more tiny hairs underneath and above its nose. We gave it some feet/shoes.

Grass Pet Face with one hair.

Materials/Tools Needed:

  • Scissors
  • Craft glue, Hot glue gun
  • Toilet Paper roll, Craft Paper, Card Board (for the shoe)
  • Pencil, Permanent Marker (to draw and decorate the shoes)
  • Small Ice Cream/Yogurt container or Toilet Paper Roll (for the body)

How to proceed:

  • Squeeze the toilet paper roll to make it flat. If you are using craft paper, fold the paper in two
  • Using a Pencil, draw a foot or shoe on one side of the toilet paper roll or the craft paper
  • Use your scissors to cut around your drawing (you will end up with a set of foot or shoe)
  • Use your Hot glue gun to glue the shoes/feet to the bottom of your body.
DIY: Grass Pet Shoes.
Grass Pet with Shoes.

On my next update I will show you how to make an outfit for the Grass Pet.

DIY: Primitive Garden Sign

EPEngineer By EPEngineer2 min read592 views

By now some of you must have noticed our fondness for Primitive Decor. I love the simplicity and uniqueness of Primitive pieces. I love how charming a space looks and feels when all the right pieces come together. Our Backyard holds a lot of handmade Primitive pieces, all of which I build myself.

In April we made a Garden Sign after gathering all the necessary materials.
The Piece of plank I used was from an old wood platform on which a metal storage shed stood. It was already broken when we found it while dismantling the shed. I knew it would someday come handy and I set it aside.

Materials/Tools Needed Step by step
  • Wood Chop Saw
  • Scrap/Reclaimed Wood
  • Nails/screws
  • Drill, Drill-bits
  • Letter Stencils
  • Spray Paint
  • Mini Garden Tool
  • Swing Hook Kit
  • Decide on the size of your Sign
  • Measure and cut your wood
  • Using your stencils, spray paint your message on the wood
  • Place your Fork on the wood and drill two holes on each side of the Fork
  • Loop a wire or cable/zip tie around it to secure the Fork
  • Pre-drill and insert the hooks into the woods top frame
  • Attach hooks to the hanging location and hang your sign
Primitive Garden Sign.
‘Primitive Charm’ Garden Sign.

For this project, I used Permatex® Copper Spray-A-Gasket® Hi Temp Adhesive Sealant for the letters. The main reason was that regular paint/spray paint was getting absorbed by the wood. It turned out that Copper Spray-A-Gasket fills minor surface irregularities, hot spots, surface imperfections, can withstand high temperatures and resist fluids which in this case was perfect for my outdoors sign.

After building the Sign, we found a Vintage Hand Fork while visiting Linda Marie’s Enchanted Treasures. The Vintage Garden Hand Fork is entirely made of metal. The Fork originally had a weathered yellow patina color as well as some wear and surface rust. To preserve its rustic feel, I sanded it a little, applied some clear coat on it for a shinning finish and to protect it from the elements. I think it complements the sign beautifully.

DIY: Grass Pet

JM Perez By JM Perez2 min read629 views

For Earth Day, my son was given a round shaped pantyhose filled with sod and grass seed. All he had to do was place it next to a window for some warm Sun light, water and watch it grow. I stored it somewhere in the Patio and forgot about it until this morning. It’s a really fun and easy activity for kids and adults alike. This Grass Pet is almost similar to the Chia Pet, remember those?

Today, we will turn this plain round shaped ball of sod and grass seeds into a cute face.

Faceless Grass Pet.
Faceless Grass Pet.
Grass Pet all decorated.

Materials/Tools Needed:

  • Pantyhose, Socks, Nylon stockings
  • Scissors (to cut the pantyhose)
  • Grass Seeds
  • Potting Mix
  • Small Ice Cream and Yogurt container or Toilet Paper Roll (for the body)
  • Spray Paint (for the body)
  • Painter’s Tape (if you’re not planning to paint the container)
  • Chenille Stems, Googly Eyes, Permanent marker, yarn (for the eyes and mouth)
  • Thread to fasten the nose.
  • Craft Paper (to design the outfit for the body)
  • Craft glue, Hot glue gun
  • Bowl and Water

How to proceed:

  1. Mix the soil and grass seed together
  2. Fill the pantyhose, shaping it into a ball and then tie off the open end (leaving enough material for the nose).
  3. Grab a bit of the stocking with some dirt and twist it to shape the nose. Use some thread to fasten it.
  4. Start decorating your grass pet whichever way you want
  5. Place it in a bowl, water daily, sit back and watch it grow.
Grass Pet Face.
Grass Pet Face with Body.

How about some Shoes for your Grass Pet? Click here.
I hope you enjoy making your own Grass Pet and watching the hair grow.

Creative Ways to Use Box Spring

JM Perez By JM Perez1 min read778 views

Last weekend, I walked into a Vintage store and was taken aback by the use of an old box spring. There were two actually; one was used as a wall accent and the other as a ceiling light.

That got me thinking about the endless possibilities of an old box spring mattress: holders,  storage, wall accent and decor, gates and fences, trellises, garden swings, yard arts, centerpieces, ceiling light fixtures, room dividers, and so much more.

Old Bed Spring.
Image Source: Pinterest.com.
Box Spring Wreath.
Image Source: JamsCraftCloset.com.
Box Spring Wreath.
Image Source: TheBackyardBungalow.com.
Box Spring Bird Feeder.
Image Source: Pinterest.com.
Box Spring Cupcake Stand.
Image Source: Etsy.com.
Box Spring Snack Holder.
Image Source: KarapaslayDesigns.com.
Box Spring Wine Bottle Holder.
Image Source: Pinterest.com.
Box Spring Wine Bottle Holder.
Image Source: AlleIdeen.com.
Box Spring Vase Holder.
Image Source: LiveLaughRowe.
Spring Box Vase Holder.
Image Source: FreePrettyThingsForYou.com.
Box Spring Pendant Light.
Image Source: GoodWillsp.
Box Spring Lampshades.
Image Source: TheArtOfUpcycling.com.
Box Spring Chandelier.
Image Source: TooWoolForCool.
Box Spring Ceiling Light.
Image Source: CraftyImaginings.blogspot.com.
Box Spring Ceiling Light.
Image Source: Pinterest.com.
Box Spring Card Holder.
Image Source: HomeHacks.co.
Box Spring Card/Picture Holder.
Image Source: FourCornersDesign.
Box Spring Hanging Pictures.
Image Source: CapitolRomance.com.
Box Spring Pot Holder.
Image Source: SammyDVintage.com.
Box Spring Christmas Tree.
Image Source: DaniellesPlace.com.
Box Spring Cross.
Image Source: Coastal Charm.
Box Spring Yard Art.
Image Source: FineHomeLamps.com.
Box Spring Garden Art.
Image Source: Yanzum.
Mattress Spring Flower Wall.
Image Source: ModernShelterBlog.com.
Spring Box Swing.
Image Source: Google.com.
Old Box Spring Shelf.
Image Source: Pinterest.com.
Arbor Topped with Old Box Spring.
Image Source: GlimpseOfMyWorld.
Box Spring Gate.
Image Source: Walking Berkeley.
Box Spring Shoe Rack.
Image Source: Pinterest.com.
Box Spring Wind Chime.
Image Source: Etsy.com.
Box Spring Sofa.
Image Source: Pinterest.ca.
Box Spring Coffee Table.
Image Source: Pinterest.com.

As you can see, the possibilities are endless …